

I notice the seasonal costumes shops are open around town, and Halloween time is coming...! As promised, here are links/ tips/ pointers on the Finn and Princess Bubblegum costumes I made this year for Comicon. This is not quite a tutorial. I didn't make actual patterns or explanatory photos along the course of this process. It was pretty impromptu. But if you're an adequate sewer and comfortable at being craftily impromptu yourself, these items can be created pretty easily.

Finn Costume:
First thing's first, sewing the hat. There are a few tutorials out there, but I think this one from Frederator is the most clear, cute, and simple by far. Sometimes you can buy the hat, but if you can't find one, or need one child-sized, this simple pattern is good place to start. I think ill-fitting head gear kind of blows the whole look, so I shaved a few centimeters off the standard dimensions, which is adult size, and it fit my 8 year-old much better. You could also try sizing down on the copier or computer, say 85%? Use the paper pattern to measure. Once the hat is done, it's super easy from there because the rest of the costume can be pretty much store bought. (Aqua tee, thank you H&M!) I went to the trouble to make my own royal blue shorts, just because I could make them super-plain and thusly more cartoon-like, but if you are more practical, any plain dark blue shorts will do. I also had the idea to buy a pair of women's black ankle socks and slip them over the sneakers to get the effect of Finn's black shoe. I thought they would shred to ribbons in half an hour, but they held up all day at Comicon with enough life left over for this Halloween. Finn's white socks are my husband's long crew socks rolled over thick to get that donut-y look.
If you are game for the backpack, there are a few tutorials out there. I wasn't a fan of most of the shapes, so I designed my own in the moments during summer swim lessons.

First I puzzled out the general pattern in these sketches. Basically, it is just an oval-shaped color blocked pillow with flat straps attached, and a painted button from our Aunt Roberta's vintage stash. (ps, bonus: post-Halloween, it makes awesome throw pillow!)
I used the model sheet drawing for Finn that I found on Art Team Go and adapted it to a template to get the right proportion:

And I printed this shape out so it measured 14.5" inches square. (I did this by changing "image size" in Photoshop before printing.) This is the extent of my pattern making abilities, so there you have it. The straps were just rectangles and measured about 14" long and 1.75" wide when finished. In this picture you can see how it wore:

I chose to stuff the backpack with polyfill, but not the straps. They wear better flat. Don't forget to leave a hole to stuff the filling, by the way!
 |
| pssst, hello! |
And viola! That's Finn.
*****
Princess Bubblegum (4T version):
With PB, there are a few key ingredients, which are usually not to be found in stores. She's a little more work than Finn, but nothing too crazy, and I took a lot shortcuts. For PB 4T, I adapted an internet pattern that we have used for other non-Adventure Time themed clothing. It is the Sweet Dress from Leila and Ben. With a few tweaks, it's the perfect blank canvas for a PB transformation and it is quick and easy to sew. Basically follow instructions but add desired longer length to hemline. And to add PB's purple sash, I sewed on some Wright's Satin Blanket Binding across front and back dress panels before stitching sides together.
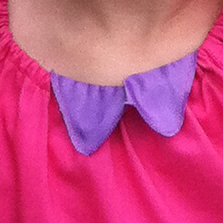 |
| smoke, mirrors, and velcro. |
For the crown, I started with this pattern from San Smith. In addition to adjusting the head width measurement, I also moved the circle with the jewel down a bit, for better child-proportion. If you don't want to sew, use paper and staples like San's, or you could make one out of felt for a more sturdy look. For our crown I stacked a sheet of heavy weight Pellon between two sheets of sticky-back yellow felt from the craft store. Then I traced the pattern on top and cut the whole thing out using scissors, but a utility knife or exacto would probably work even better. The felt usually comes only in small sheets, so you will have areas where the felt sheets tile up against each other. That's ok when it's flat, but when it curves around the head, the edges will want to pull away from the Pellon. A zigzag stitch along the seams will hold it in place. I used sticky back velcro again as the closure for the crown. If you are feeling confident in your head measurement and desire a more permanent fastening, I say go ahead and zigzag it.
For the crown's jewel, I found another button from Aunt Roberta's stash, painted it PB-jewel blue, and glued it to the crown. (I used a shank button- no holes.)

At last, the hair! The hat is to FInn as the pink hair is to PB, so we had to do it. I was recommended to try hair-chalking, and there are a lot of tutorials out there on how to do it, but usually they focus on strands of color, instead of the whole head. And we need the whole head to be glorious pink. Even in the last few months, I have noticed the products for temporary pink hair have really exploded, but back in July, we improvised.... In design school my husband had a little car rendering trick where they used to make pastel washes out of ground NuPastel and baby power. Then they used Webril pads to sweep the pastel on to the paper. So since that was what was readily available in our garage, and looks so lovely on paper after all, that is what we tried on hair.
And it works! So, to do this, get a stick of good quality quality chalk pastel (not oil!!), crush finely (I did mine with a mortar and pestle), and mix with some baby power. Then sweep some chalk grounds on the Webril pad, and "wipe" it on flat panels of hair from scalp to ends. It takes a little while, but you can get a whole head of vibrant yet temporary pink hair this way. Webrils are nice because they are large and ultra smooth. If Webrils are hard to find though, I don't see why you couldn't try other kinds of dry cotton wipes, like for makeup removal, etc. By the way, it's not a bad idea to drape a towel over shoulders to catch any rogue chalk dust. ...I should mention it helps to have a natural towhead to start with. The pink shows up great on light hair. I didn't know if it would fade or smudge during the day, but it stayed put, and after 2 or 3 washings was completely gone.
The best part of this experience was twofold: the costumes survived Comicon and now we are ready for Halloween four weeks ahead of schedule, and, when another kid asks yours, "Hey, where'd you get that costume?" you will hear your child say, "My mom made it!" So if someone has not already released a store-bought version of these costumes by now, give it a try, and good luck!
No comments:
Post a Comment